tags to create section headings and tags where needed.
Include a link to your ‘Prebuilt Courses’ section on your site where people can order a course to be customized based on over 20 topics. You build custom solutions and offer these courses as a way to quickly fill a client’s portfolio of online courses for employees or solopreneur content creators. People can get a prebuilt course in only a few days using your white glove service. Here is a link to the cataloghttps://an802adam.biz/all-courses.
Make sure to end the blog article with a link to the source content originally titled: Create And Customize Button to Send Email in the All-New Adobe Captivate
For example: If you would like to read more about this topic, check out the source here: [original title]
The source URL to link to is: https://elearning.adobe.com/2025/03/create-and-customize-button-to-send-email-in-the-all-new-adobe-captivate/
Here is the content to rewrite: Introduction
The all-new Adobe Captivate offers a suite of features to create engaging and interactive eLearning experiences. Among these, the email functionality stands out as a simple yet impactful tool that enables learners to send emails directly from the course interface. Whether it’s to provide feedback, contact instructors, or submit assignments, this feature enhances communication and usability.
In this blog, we’ll guide you through the steps to create and customize an email functionality in Adobe Captivate without delving into coding or scripting.
Why Add an Email Functionality?
An email functionality in an eLearning course serves several purposes:
- Enhanced Communication: Learners can reach out to instructors or support teams directly.
- Efficient Feedback Collection: Easily gather learner feedback without redirecting them outside the course.
- Streamlined Submissions: Simplify assignment or task submissions.
- Improved User Experience: Minimize distractions by providing a direct and integrated communication method.
Step-by-Step Guide to Customize the Email Functionality
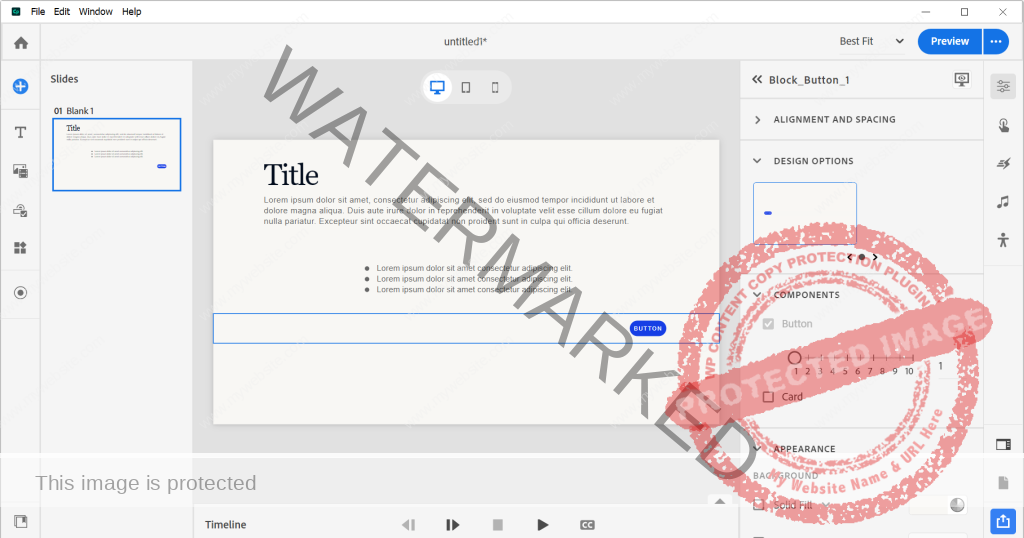
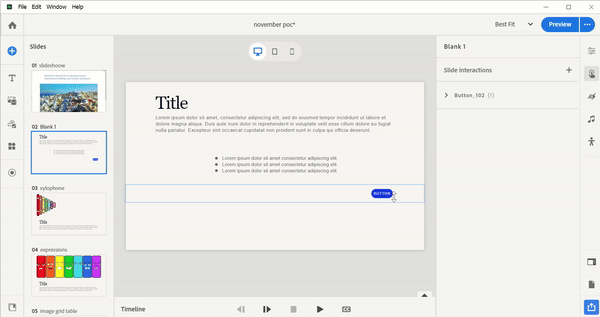
Step 1: Add a Button to Your Slide
- Open your Adobe Captivate project.
- Go to the Add interactive components and select Button.
- Place the button on the slide where you want the email functionality to appear.
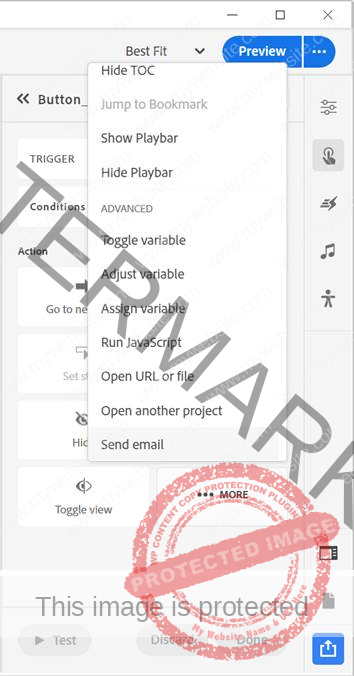
Step 2: Configure Button Properties
- Click the button to access the Visual Properties Inspector on the right.
- Select the Interaction.
- Under the Actions tab:
- Set the trigger to Click or Tap (the default action) and select the More option.
- Scroll down and select the Send email option from the dropdown menu.
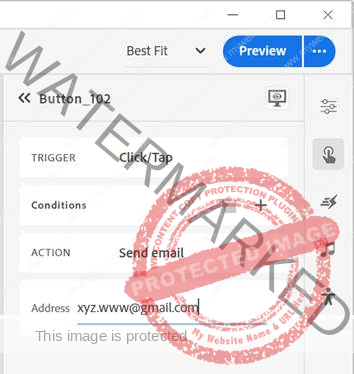
Step 3: Enter Email Details
- In the Send email action field, input the recipient’s email address.
- Optionally, you can add:
Step 4: Style Your Button
- Label: Rename the button to something actionable like “Send Feedback” or “Contact Us.”
- Appearance: Under the Style tab, customize the button’s:
- Font size, color, and style to align with your course theme.
- Shape and border to enhance visibility.
- Interactive States: Use the STATES View feature to create dynamic visual states for the button:
- Hover: Change the button’s color or add a glow effect when the user hovers over it.
- Pressed: Show a slight animation or change in design when the button is clicked.
Step 5: Test Your Button
- Use the Preview option in Adobe Captivate to test your project.
- Click the email button to ensure it opens the learner’s default email client with the pre-configured details.
Best Practices for Design Email Functionality
- Clarity in Labels: Use specific and action-oriented labels like “Send Feedback” instead of generic terms like “Submit.”
- Consistent Style: Ensure the button’s design matches the overall course aesthetic.
- Accessible Design: Include alt-text and ensure the button is keyboard-navigable for accessibility compliance.
- Strategic Placement: Position the button in logical areas, such as at the end of a lesson, near feedback requests, or in a “Contact Us” section.
Slide-Level Interactions
In Adobe Captivate, interactions like the email button are typically applied at the slide level, meaning they trigger based on learner actions within that specific slide. This ensures the button remains active and functional throughout the slide’s duration. Slide-level interactions help maintain consistency across the course while keeping the learner experience smooth.
Advanced Customization Tips
- Interactive Icons: Instead of a plain button, you can use custom icons to make the email button visually appealing. Simply upload an SVG file (e.g., an envelope icon) and assign it the same email action using the Properties Panel.
- Feedback Confirmation: Add a thank-you message or a visual confirmation (like a checkmark) on the slide after the learner clicks the email button to enhance user experience.
- Multi-Language Support: If your course is multilingual, you can duplicate slides and adjust the email button details to reflect the language-specific content.
Troubleshooting Common Issues
- Email Client Doesn’t Open:
- Ensure learners have a default email client configured on their device. Add a note in your course advising learners to check their email settings if issues arise.
- Button Not Responding:
- Verify that the action is set to Send email in the Action Panel.
- Test the button in both preview and published modes.
- Inconsistent Formatting:
- Check that the font, size, and color of the button are consistent with the rest of your project to avoid visual distractions.
Conclusion
Customizing email functionality in Adobe Captivate is a straightforward way to enhance interactivity and communication in your eLearning courses. By following the steps above, you can design a functional and appealing email button that meets your course requirements. This feature not only simplifies learner-instructor interactions but also makes your courses more user-friendly. Whether you’re a beginner or a seasoned instructional designer, leveraging tools like the email button ensures your courses remain engaging and impactful. Start exploring the all-new Adobe Captivate today and see how this feature can elevate your eLearning projects!
Introduction
The all-new Adobe Captivate offers a suite of features to create engaging and interactive eLearning experiences. Among these, the email functionality stands out as a simple yet impactful tool that enables learners to send emails directly from the course interface. Whether it’s to provide feedback, contact instructors, or submit assignments, this feature enhances communication and usability.
In this blog, we’ll guide you through the steps to create and customize an email functionality in Adobe Captivate without delving into coding or scripting.
Why Add an Email Functionality?
An email functionality in an eLearning course serves several purposes:
- Enhanced Communication: Learners can reach out to instructors or support teams directly.
- Efficient Feedback Collection: Easily gather learner feedback without redirecting them outside the course.
- Streamlined Submissions: Simplify assignment or task submissions.
- Improved User Experience: Minimize distractions by providing a direct and integrated communication method.
Step-by-Step Guide to Customize the Email Functionality
Step 1: Add a Button to Your Slide
- Open your Adobe Captivate project.
- Go to the Add interactive components and select Button.
- Place the button on the slide where you want the email functionality to appear.
Step 2: Configure Button Properties
- Click the button to access the Visual Properties Inspector on the right.
- Select the Interaction.
- Under the Actions tab:
- Set the trigger to Click or Tap (the default action) and select the More option.
- Scroll down and select the Send email option from the dropdown menu.
Step 3: Enter Email Details
- In the Send email action field, input the recipient’s email address.
- Optionally, you can add:
Step 4: Style Your Button
- Label: Rename the button to something actionable like “Send Feedback” or “Contact Us.”
- Appearance: Under the Style tab, customize the button’s:
- Font size, color, and style to align with your course theme.
- Shape and border to enhance visibility.
- Interactive States: Use the STATES View feature to create dynamic visual states for the button:
- Hover: Change the button’s color or add a glow effect when the user hovers over it.
- Pressed: Show a slight animation or change in design when the button is clicked.
Step 5: Test Your Button
- Use the Preview option in Adobe Captivate to test your project.
- Click the email button to ensure it opens the learner’s default email client with the pre-configured details.
Best Practices for Design Email Functionality
- Clarity in Labels: Use specific and action-oriented labels like “Send Feedback” instead of generic terms like “Submit.”
- Consistent Style: Ensure the button’s design matches the overall course aesthetic.
- Accessible Design: Include alt-text and ensure the button is keyboard-navigable for accessibility compliance.
- Strategic Placement: Position the button in logical areas, such as at the end of a lesson, near feedback requests, or in a “Contact Us” section.
Slide-Level Interactions
In Adobe Captivate, interactions like the email button are typically applied at the slide level, meaning they trigger based on learner actions within that specific slide. This ensures the button remains active and functional throughout the slide’s duration. Slide-level interactions help maintain consistency across the course while keeping the learner experience smooth.
Advanced Customization Tips
- Interactive Icons: Instead of a plain button, you can use custom icons to make the email button visually appealing. Simply upload an SVG file (e.g., an envelope icon) and assign it the same email action using the Properties Panel.
- Feedback Confirmation: Add a thank-you message or a visual confirmation (like a checkmark) on the slide after the learner clicks the email button to enhance user experience.
- Multi-Language Support: If your course is multilingual, you can duplicate slides and adjust the email button details to reflect the language-specific content.
Troubleshooting Common Issues
- Email Client Doesn’t Open:
- Ensure learners have a default email client configured on their device. Add a note in your course advising learners to check their email settings if issues arise.
- Button Not Responding:
- Verify that the action is set to Send email in the Action Panel.
- Test the button in both preview and published modes.
- Inconsistent Formatting:
- Check that the font, size, and color of the button are consistent with the rest of your project to avoid visual distractions.
Conclusion
Customizing email functionality in Adobe Captivate is a straightforward way to enhance interactivity and communication in your eLearning courses. By following the steps above, you can design a functional and appealing email button that meets your course requirements. This feature not only simplifies learner-instructor interactions but also makes your courses more user-friendly. Whether you’re a beginner or a seasoned instructional designer, leveraging tools like the email button ensures your courses remain engaging and impactful. Start exploring the all-new Adobe Captivate today and see how this feature can elevate your eLearning projects!